article by Jennifer Kumar
photos: Krishna Kumar
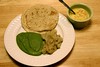
 A nice, sour fermenting smell pervaded the entire home as I lifted the cover from the idli-dosa batter! What a nice pre-Christmas gift. This time, I deviated from the regular 3 cups idli rice/1 cup urad dhal with 2 cups long grain rice from the Mexican store and 1 cup idli rice to 1 cup urad dhal, nicely ground with a few fenugreek (methi) seeds and a dash of salt. Though it's freezing out, and the floors and tabletops are colder than in the summertime, I wrapped the batter bowl in a towel and set it on the floor by the furnace heater vent. In about 36 hours, I welcomed this wonderful present! I knew my happiness would bound more once hubby would get to eat some crispy dosa on his first holiday from work for Christmas break.
 The process of making dosa and idli batter has been a difficult one for me. It's taken me more than four years, and three blenders to get the right methods. What was once cumbersome in planning, blending and fermenting- let alone getting the right pressure while ladling and forming dosas on the hot pan, is now almost effortless. For me, it's really a big accomplishment. My main motivation and inspiration to make dosas, and masala dosas come from Maya's Kitchen. Once, when we dropped by, she left a long lasting impression on me. The way she formed each dosa on the pan, spread the dosa podi on the crisp dosa while rolling in the potato curry- as a one woman assembly line feeding over 10 people left me in awe. I thought, "Would I, could I ever be so efficient at making dosa?" This experience came to me at a time where dosa batter once ladled onto the pan would just end up in a sloppy, gooey, mountain mess on the pan- so I stuck to making idlis instead while hubby effortlessly made and attempted to show and teach me the right way to spread dosa batter on the pan. So much to learn- especially in the grace required to press with just such a delicate force to assure the batter is spread in almost a spiral pattern, but that the batter remains on the pan, and we ar
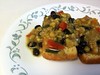
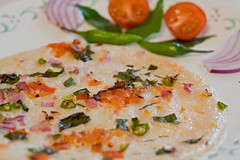 e left with a nice, crispy, almost paper-thin dosa. I started with idli, moved to utthapam (a thicker dosa topped with chopped veggies, pictured, right), and recently as of this year started making the paper-thin variety. I still have a way to go to perfect my talent, but I know I am on the right track!
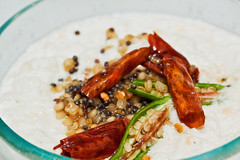
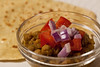
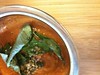
But, idli and dosa can not be eaten alone. They are always accompanied by something- dosa podi with oil, a variety of chutneys, sambar, [Indian] pickles, and many other sides I have yet to discover. On hot days, somehow I like to eat  idli with yogurt as a plain dish- no spices, which is good on the stomach. I prefer to eat other's homemade prepared dosa podi (powders made with roasted spices and lentils), which I mix with sesame oil, and hubby mixes with olive or vegetable oil. For chutneys, I make tomato (photo, right), onion or coconut chutney. If we have left over idlis, later I will take, cut them and make an idli upma (dry fry of idli pieces mixed with tempered curry leaves, mustard seeds, urad dhal, and few other spices, similiar to Quinoa Upma, with idli pieces instead of Quinoa).
For those new to this cuisine, idli are steamed cakes made from the batter that dosa is made from. Some purists may actually make two batters- the idli batter and dosa batter- with a slightly different proportion of rice to urad dhal. I don't do that- too much work right now! 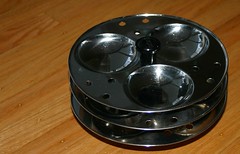 These cakes are steamed in an idli pan set into a big pressure cooker. I usually steam it for about 20 mintues. However, last night I tried something new- I steamed them in a egg poacher. This cooking gadget is a more western contraption and is more easily available in America than idli pans, and pressure cookers (though pressure cookers are available in American stores, most Americans do not use pressure cookers). I steamed four idlis in the egg poacher last night. The final product, after 20 minutes of steaming is a cake a bit thicker and not as wide as the ones made in an idli pan, so they are actually a bit more filling per idli. However, we realized, it needs to steam a bit longer. Maybe next time I will leave it in there about 25 minutes- the middle section was still a bit uncooked, but edible.
Recipes:
Idli/Dosa Batter
3 cups rice
1 cup urad dhal
1 tsp methi (fenugreek seeds)
Method:
1. Soak rice and dhal in separate bowls for about 6 hours. Soak the fenugreek seeds in with the rice.
**If you are curious what rice to use, I usually use 'idli rice' available at the Indian store. If I don't have that on hand, I use 'ponni rice' also available at the Indian store. However, if you have no Indian store nearby, you can use long grain rice, that works well too.
2. Puree the rice separately and dhal separately, with little water. The consistency should be like pudding/thick pancake batter.
Blending the dhal is usually easier than the rice. Dhal will easily and quickly blend and puree. Check with your finger in between, before taking out of the blender. Take a bit of the batter between your thumb and forfinger, rub your fingers together, you should not feel any lumps or grains. It will feel 'like satin', smooth and velvety.
For the rice, it is a bit more tricky. The best batter is made by pureeing the rice separately from the dhal, because to get this velvety feeling from the rice, it takes a bit longer to blend. While urad takes about 3-5 minutes to get velvety smooth, rice may take 5-10 minutes depending on your blender's power. When you check the rice in between for smoothness, the graininess will decrease. Also, as one blends the rice, the batter thickens as the mixture becomes more velvety. Hope that makes sense! (Fenugreek seeds will be pureed along with the rice.)
3. When both urad and rice have been pureed sufficiently, mix these two purees together in a big bowl. Make sure there is room in the bowl above the line of the batter, to give room for batter to rise. Blending will take anywhere between 15-30 minutes.
4. After mixing the two batters, set this bowl aside for one day to two days depending on the climate. Some people suggest having the batter in a metal or glass bowl and keeping in the oven with the light on (no heat) for fermenting. I have not done this. I usually put the mixture in a plastic bowl, twice the size of the batter, assure the lid is on tightly, wrap it in a towel. If it is summer, I put it on the counter top for 1-2 days. In winter, I wrap the bowl in a towel and place it on the floor on a blanket in front of the heater vent for 1-2 days. I check the batter at intervals of about 12 hrs, 20 hrs, 30 hrs, etc or whenever I remember. Batter is ready when the lid is removed and a sour aroma hits you in the face and when the lid is fully taken off, the batter has mushroomed up- it is fermented and risen. Timing for this is between 15-48 hours depending on climate conditions.
5. Batter should be a pouring consistency to make dosa or idli. The consistency should be like a milkshake- thin, consistently smooth and pourable. Sometimes when the batter ferments and rises, it also thickens. It is important to add water little by little to get the batter to the right consistency. Some will take water in a bowl, dip fingers into it, and spray water with fingers little by little into the batter, mixing it with a spatula or fork until the right consistency is attained.
Wondering how many servings this batter makes? I am really not sure! It lasts us about 2-3 days of idli dosa making. I eat between 3-5 idlis, and he eats about 3-5 dosas. Roughly one ladle is one serving (1 ladle batter=1 idli= 1 dosa). If I make an educated guess, I'd say between 12-17 servings of idli/dosa from this batter.
How to fry/make dosa
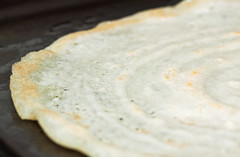
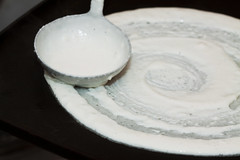
If making dosa, the pan must be very hot. So hot that steam will be seen rising off the pan, even when frying, as to the right. (Click on all photos for bigger sizes.) Some take the pan off for a f ew seconds before pouring batter on it. A ladle of batter is put on the pan and in concentric, even circles the batter is made into a thin pancake. Dripping a little oil around the sides of the dosa is important to make it crispy. Keep the heat on high, and watch the dosa. When it is first put on the pan, good batter will bubble and bubbles will burst as it fries. Usually we do not flip for about 5-6 minutes. To know when to flip, it would be possible to see the browness of the bottom coming through to the top, but not blackening or burning. When it is time to flip, taking the spatula around the 'edges' it would come off easily when the bottom has browned slightly. Flip and fry a bit on the other side. Do drip oil around it and move the pan around to get the oil to go under the dosa. This is not deep frying- a lot of oil is not needed- about 2-3 teaspoons per dosa is used. Some people may use more to get it a bit more crispy and brown. It is imperative to use oil to get a true taste out. The few times I tried to make a 'diet dosa' I realized it just wasn't worth it!
How to make/steam idlisIf you have the Indian utensils, oil the idli pan and put about an inch of water in the bottom of the pressure cooker and heat the pan. Place batter in each oiled idli mold about 1/2-3/4 full. Place the idli stand inside the pot. Put the top on, do not put the weight on the pressure cooker. Once steam comes from the top, time it for about 20 minutes. Take out and enjoy!
How to steam idlis in an egg poacher panThis method is similar to the above. Take each egg poacher insert, oil it, and fill it about 1/2-3/4 full with the batter. Steam on high heat about 25 minutes.
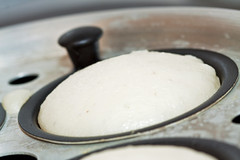
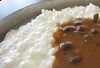
Close up of Idli
fluffing up in poacher pan.
|
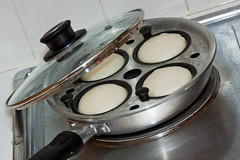
Pan view.
|
Making Coconut Chutney Side Dish:This two step coconut chutney recipe is so easy. It was taught to me by my father-in-law.
Step 1:
1/2 cup grated coconut
2 tbpsn chenna dhal (uncooked)
2 green chilies
dash salt
1/4 cup water
Place all these items in a blender and puree it. It may become thick, add 1/8 cup more water. Some people like the chutney thick, others more watery. The dhal would take some more time to puree. If you want to make it a bit easier to blend, soak the dhal separately in water for about 30 minutes before blending.
Place the pureed coconut mix into a serving bowl.
Step 2
Oil
pinch black mustard seeds
10 curry leaves
2 green chilies cut lengthwise
2 dried red chilies broken in half
1 tsp urad dhal
Take a small frying pan. Heat it. Put in the oil (about 2 tablespoons). Heat the oil. Put in the mustard seeds. Take care, when they heat they will burst out of the pan. This is important to get the right smell and taste.
When the seeds have burst, slightly move the pan up off the flame/stove and add in the other spices, temper them a few minutes until the urad dhal seems brown, not black. When it's ready (only takes about 2-3 minutes) put this mix on the top of the coconut mixture already in the bowl. Though it looks nice sitting on top of the coconut, as in the photo, do mix the spices into the coconut puree and sit aside for 10-20 minutes to let the flavors mix. It's so tasty!!
**I like to take the green chilies, urad and red chilies and put them in a small bowl so when oil and mustard seeds are ready, I can just drop the whole thing right into the pan!
Related Posts/Sites:
Maya's Kitchen- My local friend's vegetarian and non-vegetarian delicaciesPongal Holiday Potluck Menu and RecipesQuinoa UpmaRaw Onion ChutneyStovetop, electric and microwave egg poachers. Tomato Chutney by Nithya


.JPG)